Search Results
30 items found for ""
- Super Loud Bathroom Fan Vent... Is it Broken? Complete Guide.
Got a super loud bathroom fan vent, can it be fixed? Yes! Often you can follow these simple instructions to fix it yourself! 00:52 The Tools • Step ladder - https://amzn.to/3bg8azE • Flathead screwdriver -- https://amzn.to/2RAjTlU • Toothbrush or soft-bristled cleaning tool - https://amzn.to/3hdBbzP • Pilers or Wrench - https://amzn.to/3bh4Ggx • Mini Shop Vac - https://amzn.to/33rPSqZ • Compressed Air Bottle or Air Compressor - https://amzn.to/3f7f6jF • Extension Cord - https://amzn.to/3f4C4If 00:00 Intro 00:07 The Problem 00:52 The Tools 01:15 The Fix Solve this problem by seeing if it's filled with dust and lent! Take off the Broan NuTone fan cover off and begin cleaning. Often these fans get caked with debris that makes the fan run very loud and seem like it's broken. After cleaning it they often return to their normal running loudness. Check out my website at http://mcfixit.us Disclaimer: Due to factors beyond the control of MC FIX IT, I cannot guarantee against improper use or unauthorized modifications of this information in the video, post, blog, or social media. MC FIX IT assumes no liability for property damage or injury incurred as a result of any of the information contained in this video. Use this information at your own risk. If you feel uncomfortable at any time. Stop and go to a professional. MC FIX IT recommends safe practices when working on vehicles, your house, or any other project and or with tools seen or implied in this video. Due to factors beyond the control of MC FIX IT, no information contained in this video shall create any expressed or implied warranty or guarantee of any particular result. Any injury, damage, or loss that may result from improper use of these tools, equipment, or from the information contained in this video is the sole responsibility of the user and not MC FIX IT. #mcfixit #homerepair #fix #repair #bathroomvent #fan #cleaning #broan #broannutone
- How to Fix a Broken Ethernet Cable Cat6 with a Crimp RJ45 Connector Pass-Thr w/ TEST. Complete Guide
Ever had a wire break on your ethernet cable? With this quick tutorial, you can fix it yourself. 00:41 The Tools • Klein Pass-Thru - https://amzn.to/3hewtlC • Jacket Wire Stripper for RJ45 - https://amzn.to/33vSfZK • Klein RJ45 Pass-Thru Connectors - https://amzn.to/2RFatoW • Cat6 Cable - https://amzn.to/3exuHKi • Scissors - https://amzn.to/3tqn8ti • RJ45 Tester - https://amzn.to/3ben0XC • Heat Shrink Wrap - https://amzn.to/3hdOxMH • Heat Gun - https://amzn.to/3hk2RmV 01:06 The Fix - learn how to strip, align wires, crimp, and heat shrink wrap a new connector. 08:26 The Test - use the tester to ensure your wiring is done correctly! You can easily fix your own broken wires or connectors with just a few tools and the know-how described in this video. Check out my website at http://mcfixit.us Disclaimer: Due to factors beyond the control of MC FIX IT, I cannot guarantee against improper use or unauthorized modifications of this information in the video, post, blog, or social media. MC FIX IT assumes no liability for property damage or injury incurred as a result of any of the information contained in this video. Use this information at your own risk. If you feel uncomfortable at any time. Stop and go to a professional. MC FIX IT recommends safe practices when working on vehicles, your house, or any other project and or with tools seen or implied in this video. Due to factors beyond the control of MC FIX IT, no information contained in this video shall create any expressed or implied warranty or guarantee of any particular result. Any injury, damage, or loss that may result from improper use of these tools, equipment, or from the information contained in this video is the sole responsibility of the user and not MC FIX IT. #mcfixit
- How to repair Bathroom Exhaust Fan Light that's not working. Easy Fix!
Learn how to fix your bathroom exhaust fan/vent light that won't work. The light does not turn on and it's not the bulb. This repair is pretty easy to do and only takes about 5 minutes from start to finish! TOOLS: Flathead Screwdriver - https://amzn.to/2RAjTlU Multimeter (optional) - checking continuity - https://amzn.to/3o1T5qw You can easily fix this yourself. Please be careful of the rotating fan and the electricity. Use common sense and turn off the switch and breaker if you go into the housing the exhaust. Check out my website at http://mcfixit.us Disclaimer: Due to factors beyond the control of MC FIX IT, I cannot guarantee against improper use or unauthorized modifications of this information in the video, post, blog, or social media. MC FIX IT assumes no liability for property damage or injury incurred as a result of any of the information contained in this video. Use this information at your own risk. If you feel uncomfortable at any time. Stop and go to a professional. MC FIX IT recommends safe practices when working on vehicles, your house, or any other project and or with tools seen or implied in this video. Due to factors beyond the control of MC FIX IT, no information contained in this video shall create any expressed or implied warranty or guarantee of any particular result. Any injury, damage, or loss that may result from improper use of these tools, equipment, or from the information contained in this video is the sole responsibility of the user and not MC FIX IT. #mcfixit #houserepair #fix #repair #exhaustvent #lightnotworking #exhaustfan
- 4 Ways to Connect Wires: Split & Tape, Butt Connectors, Heat Shrink Crimp, and Solder. Complete DIY
Ever had a wire break or break through the protective casing? Then you need to watch this video with four ways to solve this problem. In each of these ways, you will how to strip and connect two wires together. Tools: • Heat Shrink Wrap - https://amzn.to/3bghFPr • Heat Gun - https://amzn.to/3tBbRGu • Wire Strippers - https://amzn.to/3ezQmBU • Helping Hands Tool - https://amzn.to/3vSOLwD • Electrical Tape - https://amzn.to/3hfLeEK • 18 Gauge Butt Connectors - https://amzn.to/3h8YN8S • 18 Gauge Heat Shrink Connectors - https://amzn.to/3bengG4 • Wire Crimper Tool - https://amzn.to/2SEORtB • Solder 60/40 - https://amzn.to/3vQJ7uY • Rosin Flux - https://amzn.to/3euwLTo • Solder Iron - https://amzn.to/3heXogQ 00:07 - The Four Ways Described 00:43 - The TOOLS for each way 03:32 - 1. Split & Tape 07:49 - 2. Butt Connectors (+ Heat Shrink Wrap) 08:34 - 3. Heat Shrink Crimp Connectors 11:32 - 4. Solder (+ Heat Shrink Wrap) 18:11 - PULL TEST: See how each holds up by pulling them! You can easily fix your own broken wires with just a few tools and the know-how described in this video. Check out my website at http://mcfixit.us Disclaimer: Due to factors beyond the control of MC FIX IT, I cannot guarantee against improper use or unauthorized modifications of this information in the video, post, blog, or social media. MC FIX IT assumes no liability for property damage or injury incurred as a result of any of the information contained in this video. Use this information at your own risk. If you feel uncomfortable at any time. Stop and go to a professional. MC FIX IT recommends safe practices when working on vehicles, your house, or any other project and or with tools seen or implied in this video. Due to factors beyond the control of MC FIX IT, no information contained in this video shall create any expressed or implied warranty or guarantee of any particular result. Any injury, damage, or loss that may result from improper use of these tools, equipment, or from the information contained in this video is the sole responsibility of the user and not MC FIX IT. #mcfixit #howtovideo #crimpwires #connectwires #solder
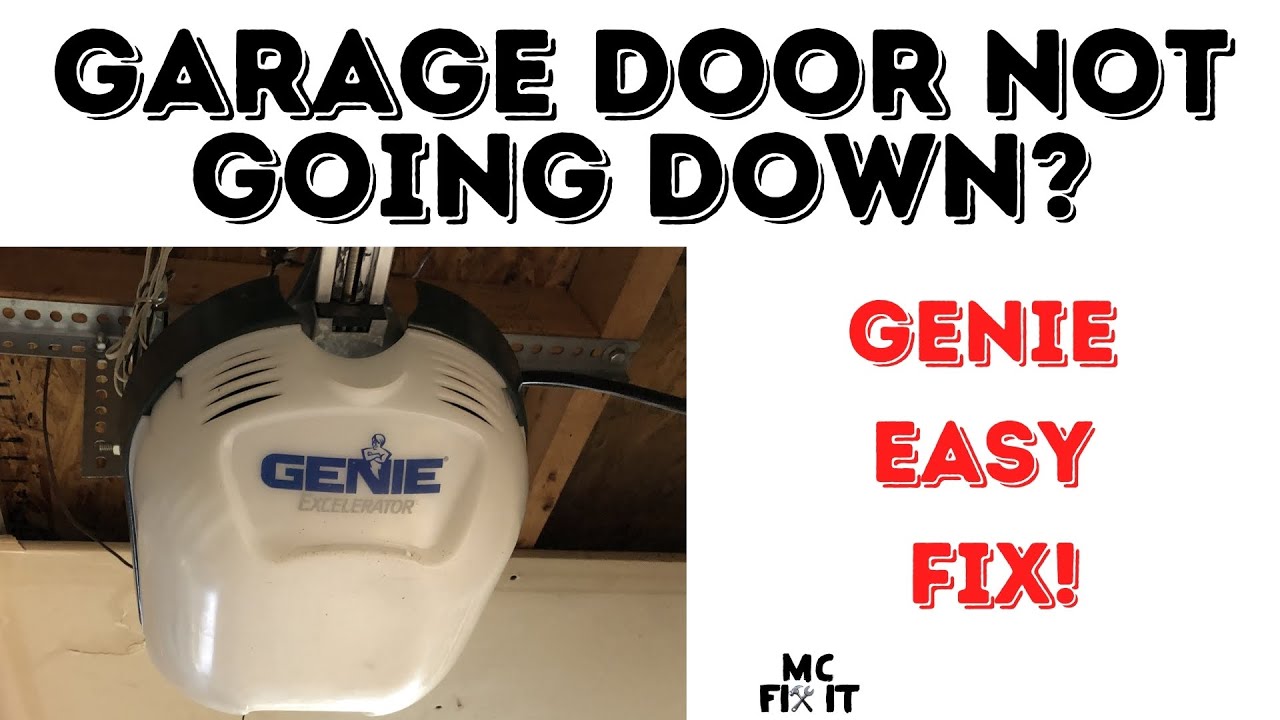
- Garage Door Not Going Down? Check out this super easy fix!
Here's an easy fix on my Genie Excelerator (1/2 HP Model ISD 995) with a 5 blinking light code. This repair is pretty easy to do and only takes about 5 minutes from start to finish! TOOLS: • Garage Door Opener • Step Ladder - https://amzn.to/3bg8azE Check out this easy fix before calling out a repair person! My garage door motor displayed 5 GREEN BLINKING lights in a row. You can see these lights under the white plastic enclosure. The sensors must be aligned. One will be green and the other red (with no flashes)! 00:00 Intro 00:07 The Problem 00:20 The Fix This video should work on all Genie makes and models. Disclaimer: Due to factors beyond the control of MC FIX IT, I cannot guarantee against improper use or unauthorized modifications of this information in the video, post, blog, or social media. MC FIX IT assumes no liability for property damage or injury incurred as a result of any of the information contained in this video. Use this information at your own risk. If you feel uncomfortable at any time. Stop and go to a professional. MC FIX IT recommends safe practices when working on vehicles, your house, or any other project and or with tools seen or implied in this video. Due to factors beyond the control of MC FIX IT, no information contained in this video shall create any expressed or implied warranty or guarantee of any particular result. Any injury, damage, or loss that may result from improper use of these tools, equipment, or from the information contained in this video is the sole responsibility of the user and not MC FIX IT. #mcfixit #houserepair #fix #repair #garage #garagedoor
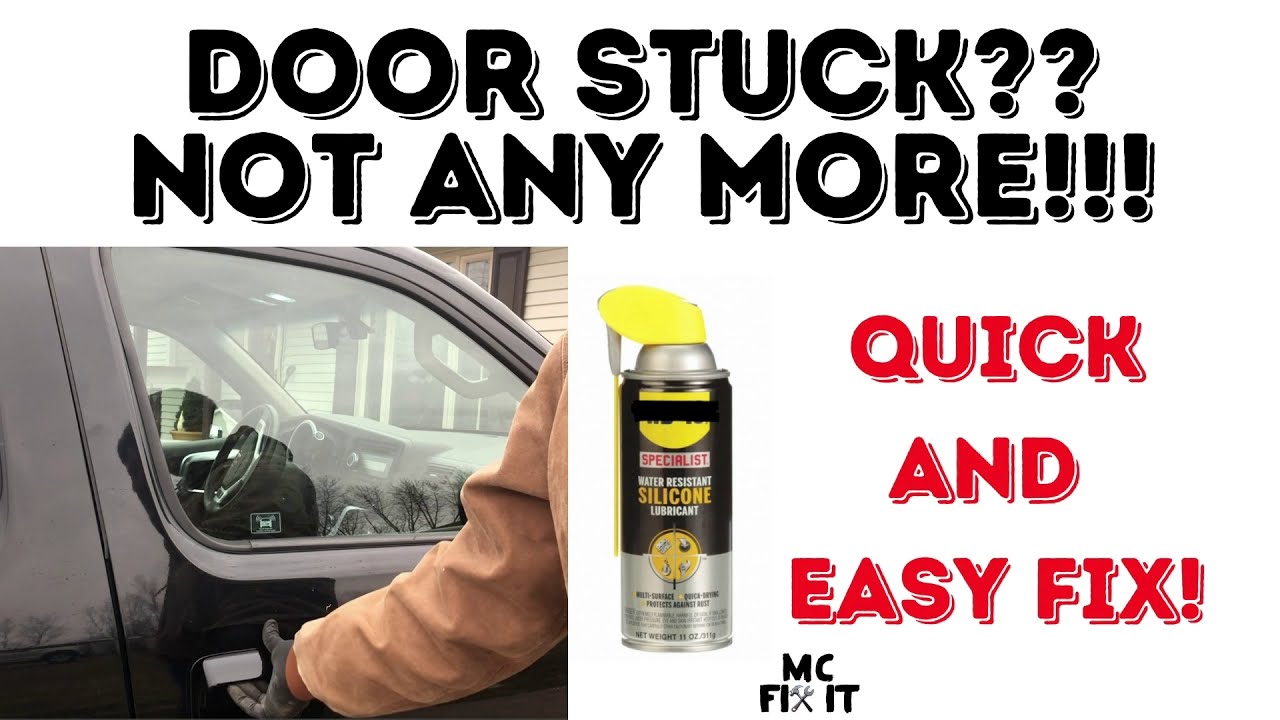
- Car Stuck Door? Not Any More! Use this one lubrication to help you never get a stuck door again!
Here is a video on how to keep your doors from sticking in the winter! This one lubrication can keep your doors from getting stuck! TOOLS: 00:25 • SILCONE LUBRICATION - Dry Lubricant, -100° to 500°F - https://amzn.to/3f4MNm3 • SHOP TOWELS - https://amzn.to/2SC8D93 You can easily keep yourself from getting stuck out in the cold by doing this to all your door's weather trim! 00:00 - Intro 00:07 - The Problem 00:25 - The Tools This video should work on all makes and models! Check out my website at http://mcfixit.us Disclaimer: Due to factors beyond the control of MC FIX IT, I cannot guarantee against improper use or unauthorized modifications of this information in the video, post, blog, or social media. MC FIX IT assumes no liability for property damage or injury incurred as a result of any of the information contained in this video. Use this information at your own risk. If you feel uncomfortable at any time. Stop and go to a professional. MC FIX IT recommends safe practices when working on vehicles, your house, or any other project and or with tools seen or implied in this video. Due to factors beyond the control of MC FIX IT, no information contained in this video shall create any expressed or implied warranty or guarantee of any particular result. Any injury, damage, or loss that may result from improper use of these tools, equipment, or from the information contained in this video is the sole responsibility of the user and not MC FIX IT. #mcfixit #autorepair #fix #repair #doorstuck #stuck #door
- Clean your engine bay with ONE chemical & shop towels! NO WATER NEEDED!
Learn how to clean your engine bay with only ONE chemical! This fix is very easy to do and only takes about 5-10 minutes from start to finish! TOOLS: • UV Protectant Spray for Vinyl, Plastic, Rubber, Fiberglass, Leather & More – Dust and Dirt Repellant - https://amzn.to/3f2Cxe1 • Shop Towels - https://amzn.to/2SC8D93 00:00 - Intro 00:07 The Probem 00:25 The Tools You can do this! Keep your engine bay looking good and free from dirt and debris! This fix will work on all makes and models. Make sure to not spray directly onto electrical wiring and battery! Check out my website at http://mcfixit.us Disclaimer: Due to factors beyond the control of MC FIX IT, I cannot guarantee against improper use or unauthorized modifications of this information in the video, post, blog, or social media. MC FIX IT assumes no liability for property damage or injury incurred as a result of any of the information contained in this video. Use this information at your own risk. If you feel uncomfortable at any time. Stop and go to a professional. MC FIX IT recommends safe practices when working on vehicles, your house, or any other project and or with tools seen or implied in this video. Due to factors beyond the control of MC FIX IT, no information contained in this video shall create any expressed or implied warranty or guarantee of any particular result. Any injury, damage, or loss that may result from improper use of these tools, equipment, or from the information contained in this video is the sole responsibility of the user and not MC FIX IT. #mcfixit #autorepair #fix #repair #clean #engine #bay #diy
- 10 Winter Vehicle Hacks - Do these ten things to keep you on the Road!
Here are 10 Winter Hacks to keep you on the road this year! WHAT YOU NEED TO & Supplies: 01:38 #1 - Battery • Battery Terminal cleaner - https://amzn.to/3xZ4I6w • Multimeter - https://amzn.to/3o1T5qw • Battery Terminal Protectant Spray - https://amzn.to/3vVahB2 • Take the vehicle to a local auto parts store for a FREE test 04:24 #2 - Jumper Cables • A Good set of copper cables that are thick - https://amzn.to/3y1c6Ow • A car with a good battery to jump off of 06:02 #3 - Deicer for Window • Window washer fluid with deicer built-in. Get at least -25*F • Funnel (optional) 07:28 #4 - Scraper • Get a full size one for each vehicle you own 09:55 #5 - Tires • Tire pressure gauge • Tread depth tool - https://amzn.to/3o4eu2l 12:29 #6 - Anti-Freeze / Coolant • Your vehicles Anti-freeze type • Funnel 14:27 #7 - New Wiper Blades • Get the correct size for each of your blades 17:19 #8 - Car Wrap to cover vehicle • Cover • Cardboard 19:55 #9 - Silicone Lubricant for window cables and weather stripping on doors • Silicone Lubricant - https://amzn.to/33rJekw • Shop Towels - https://amzn.to/3b9UHcP 22:00 #10 - Extra Bag of Tools and Supplies • Common Tools - wrenches, screwdrivers, etc • Bottles of water • Thick blanket • Flashlight • Cell phone charger • Hand warmers (optional) You can easily make your vehicle ready for winter with these 10 hacks! These things will help keep you on the road! This video should work on all makes and models. Check out my website at http://mcfixit.us Disclaimer: Due to factors beyond the control of MC FIX IT, I cannot guarantee against improper use or unauthorized modifications of this information in the video, post, blog, or social media. MC FIX IT assumes no liability for property damage or injury incurred as a result of any of the information contained in this video. Use this information at your own risk. If you feel uncomfortable at any time. Stop and go to a professional. MC FIX IT recommends safe practices when working on vehicles, your house, or any other project and or with tools seen or implied in this video. Due to factors beyond the control of MC FIX IT, no information contained in this video shall create any expressed or implied warranty or guarantee of any particular result. Any injury, damage, or loss that may result from improper use of these tools, equipment, or from the information contained in this video is the sole responsibility of the user and not MC FIX IT. #mcfixit #autorepair #fix #repair #winter #cold #freezing
- How Much Tire Tread Do I Need??? Here's a cheap and easy tool to know exactly how much is left!
This video is to show you how much tread you have left on your tires. TOOLS: • Tire Tread Gauge Tool - $2.98 at Walmart - https://www.walmart.com/ip/Slime-Tread-Depth-Tire-Gauge-1-32-to-1-20177/146670621?wmlspartner=wlpa&selectedSellerId=0&&adid=22222222227074381728&wl0=&wl1=g&wl2=c&wl3=186808196838&wl4=aud-393207457166:pla-295209135092&wl5=9014897&wl6=&wl7=&wl8=&wl9=pla&wl10=8175035&wl11=online&wl12=146670621&veh=sem&gclid=CjwKCAiA57D_BRAZEiwAZcfCxYYLci0mJWbxLqqAZAzksPbQ8aJtsNK74ZzDs8Wudcmb8SSk-FpJEBoCngMQAvD_BwE Check out what your state's regulations are here for tread: https://oversize.io/regulations/tire-regulations-by-state You can easily check tread in a matter of seconds. Make sure to this in across the tire to make sure one side is not lower than others. This video will help you with all makes and models of tires. Check out my website at http://mcfixit.us Disclaimer: Due to factors beyond the control of MC FIX IT, I cannot guarantee against improper use or unauthorized modifications of this information in the video, post, blog, or social media. MC FIX IT assumes no liability for property damage or injury incurred as a result of any of the information contained in this video. Use this information at your own risk. If you feel uncomfortable at any time. Stop and go to a professional. MC FIX IT recommends safe practices when working on vehicles, your house, or any other project and or with tools seen or implied in this video. Due to factors beyond the control of MC FIX IT, no information contained in this video shall create any expressed or implied warranty or guarantee of any particular result. Any injury, damage, or loss that may result from improper use of these tools, equipment, or from the information contained in this video is the sole responsibility of the user and not MC FIX IT. #mcfixit #autorepair #fix #repair #tire #flat #tire #tread
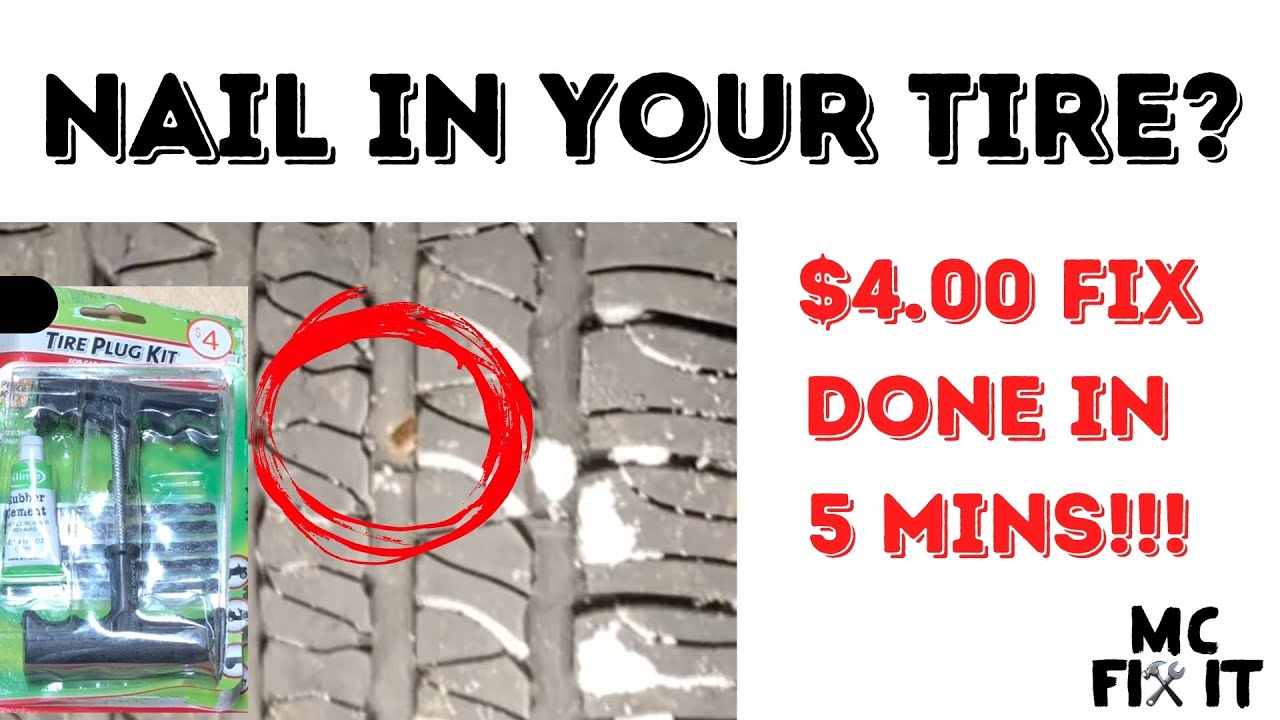
- Nail in Tire? Got a Flat Tire? For $4.00 quick fix done in 5 minutes. Fix your flat tire easily!
Here is a video on how to remove a nail in your tire. The kit cost me $4.00 and has 5 plugs in it for future repairs at other times. This repair is pretty easy to do and only takes about 5 minutes from start to finish! TOOLS: 00:17 * Needle Nose Pliers - https://amzn.to/3uyzh0L * Tire Plug Kit (2 tools, plugs, and glue) * Air Compressor - https://amzn.to/3f7f6jF Optional: * Floor Jack (3 Ton) - https://amzn.to/2R7G96H * Jackstand (3 Ton)- https://amzn.to/3f3ABC5 This video should work on nearly every make and model of vehicle including other types of tires that get nails in them! Check out my website at http://mcfixit.us Disclaimer: Due to factors beyond the control of MC FIX IT, I cannot guarantee against improper use or unauthorized modifications of this information in the video, post, blog, or social media. MC FIX IT assumes no liability for property damage or injury incurred as a result of any of the information contained in this video. Use this information at your own risk. If you feel uncomfortable at any time. Stop and go to a professional. MC FIX IT recommends safe practices when working on vehicles, your house, or any other project and or with tools seen or implied in this video. Due to factors beyond the control of MC FIX IT, no information contained in this video shall create any expressed or implied warranty or guarantee of any particular result. Any injury, damage, or loss that may result from improper use of these tools, equipment, or from the information contained in this video is the sole responsibility of the user and not MC FIX IT. #mcfixit #autorepair #fix #repair #tire #flat #nail
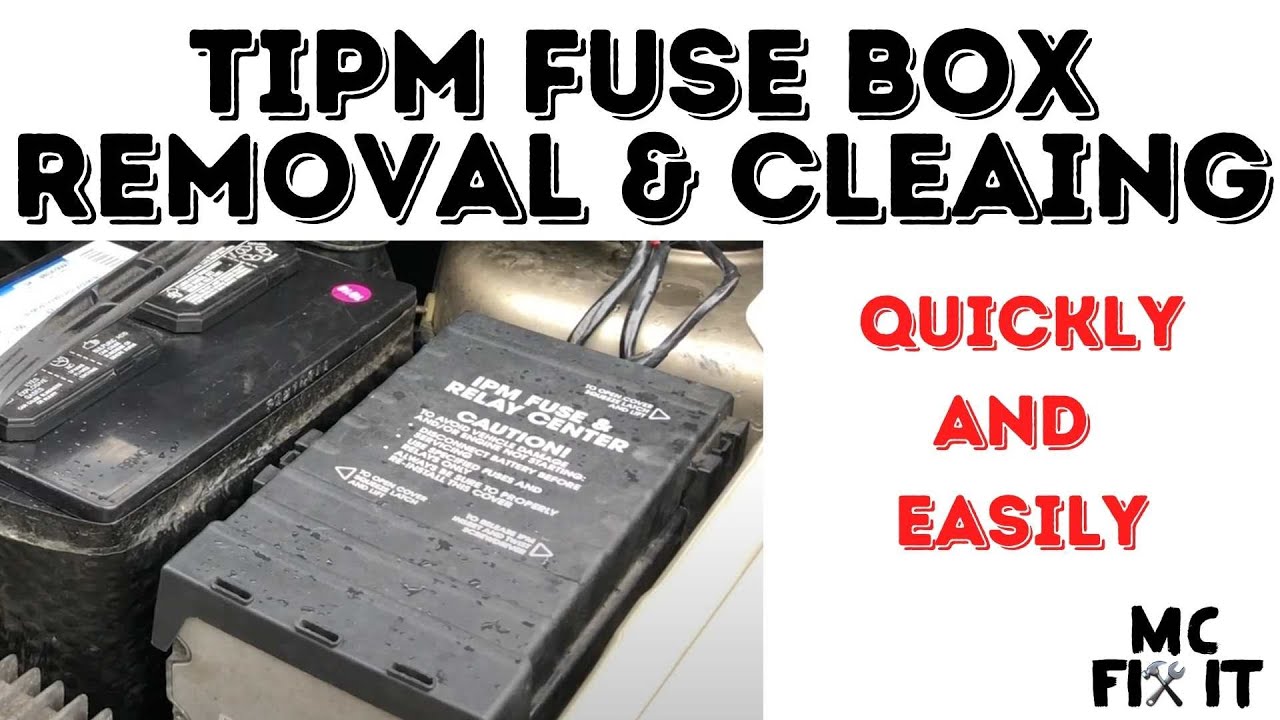
- TIPM IPM fuse box removal and cleaning for Dodge Caravan & Chrysler Town & Country 2001-2007
Here is a video on how to remove your fuse box, clean it, and put it back into place. This repair is pretty easy to do and only takes about 40 minutes from start to finish! TOOLS: • Philips Screw Driver - https://amzn.to/3hdpzx0 • T25 Screw Driver - https://amzn.to/33pVkL9 • Pick (optional) - https://amzn.to/3nZM8q4 • Magnetic Metal Tray (optional) - keeps you from losing screws and bolts - https://amzn.to/3hdUiJZ • Multimeter (optional) - checking fusing - https://amzn.to/3o1T5qw You can easily check your fuses to ensure they are working by using a multimeter and using the continuity setting and attach it to both of the metal pieces. If it peeps, then it's good. This video should work on Dodge Caravan and Chrysler Town and Country for Generation 4 for the years of 2001, 2002, 2003, 2004, 2005, 2006, 2007. It should be very similar for years before and after this. Check out my website at http://mcfixit.us #mcfixit #TownNCountry #Caravan #fix #repair #mcfixit #autorepair #fix #repair #nostart #nocrank #intermittentstart #batterycable #nostart #nocrank #carrepair #dodgecaravan #chryslertownandcountry #chrysler #dodge #nostartnocrank #carstarting #caravan #wontstart #fixed #fix Disclaimer: Due to factors beyond the control of MC FIX IT, I cannot guarantee against improper use or unauthorized modifications of this information in the video, post, blog, or social media. MC FIX IT assumes no liability for property damage or injury incurred as a result of any of the information contained in this video. Use this information at your own risk. If you feel uncomfortable at any time. Stop and go to a professional. MC FIX IT recommends safe practices when working on vehicles, your house, or any other project and or with tools seen or implied in this video. Due to factors beyond the control of MC FIX IT, no information contained in this video shall create any expressed or implied warranty or guarantee of any particular result. Any injury, damage, or loss that may result from improper use of these tools, equipment, or from the information contained in this video is the sole responsibility of the user and not MC FIX IT.
- Acessory Light Bulb Replacement - AC/Heat- Caravan & Town and Country - Dodge / Chrysler 2001-2007
Here is a video on how to replace your light bulbs for your accessory panel for the AC, Heat, and motor blower dial. This repair is pretty easy to do and only takes about 10 minutes from start to finish. I did it in real-time to show you the amount of time it actually takes! TOOLS: • Philips Screw Driver - https://amzn.to/3hdpzx0 • Flat Head Screw Driver - https://amzn.to/2RAjTlU • T10 Screw Driver - https://amzn.to/3beIrrn • Pick (optional)- https://amzn.to/3nZM8q4 • Magnetic Metal Tray (optional) - keeps you from losing screws - https://amzn.to/3hdUiJZ • Multimeter (optional) - https://amzn.to/3o1T5qw You can easily check your bulbs to ensure they are working by using a multimeter and using the continuity and attach it to both of the metal pieces. If it peeps, then it's good. This video should work on Dodge Caravan and Chrysler Town and Country for Generation 4 for the years of 2001, 2002, 2003, 2004, 2005, 2006, and 2007. It should be very similar for years before and after this. Check out my website at http://mcfixit.us #mcfixit #Town&Country #Caravan #fix #repair Disclaimer: Due to factors beyond the control of MC FIX IT, I cannot guarantee against improper use or unauthorized modifications of this information in the video, post, blog, or social media. MC FIX IT assumes no liability for property damage or injury incurred as a result of any of the information contained in this video. Use this information at your own risk. If you feel uncomfortable at any time. Stop and go to a professional. MC FIX IT recommends safe practices when working on vehicles, your house, or any other project and or with tools seen or implied in this video. Due to factors beyond the control of MC FIX IT, no information contained in this video shall create any expressed or implied warranty or guarantee of any particular result. Any injury, damage, or loss that may result from improper use of these tools, equipment, or from the information contained in this video is the sole responsibility of the user and not MC FIX IT.